Technical Guide for Using DSD Controllers
Email support and guidance for DSD Circuits is not provided. These are DIY components, and in the spirit of the "Do It Yourself" man, you will need to "do it yourself" and rely on your own skills, knowledge and abilities in order to integrate DSD circuits into your sim racing space. All DSD electronics are thoroughly tested for proper function before they are shipped to you. The information below is what is provided so you know the full technical data on each device, how they are configured, and how various components connect to them. Take the time to read all of the necessary facts so that your use of our electronics is enjoyable and that you know precisely how to use them and how to integrate them into your your gaming space.
Section 1: Configuring the DSD 32 Button Controller and DSD Micro 32 Button Controller with rotary encoders, rotary switches or on/off toggles:
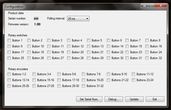
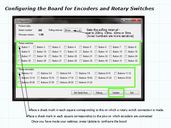
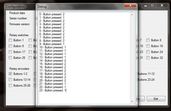
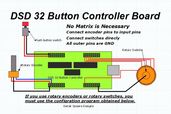
You will need to download and run the DSD Button Controller Configuration Utility HERE. Follow the simple steps outlined in the diagrams below to configure your 32 button controller for use with rotary encoder, rotary switch or on/off toggles connections. If you are not using encoders or rotary switches, you DO NOT need to run the configuration program. If you connect encoders/rotaries you must configure the board, but once you configure the board, you don't need to run it again. Also note carefully that all encoder connections must be connected on consecutive ODD/EVEN pins; e.g.: Connect your encoder on PIN1/PIN2, NOT Pin2/Pin3.
Section 2: Configuring the DSD 64 Button Controller with rotary encoders, rotary switches or on/off toggles:
You will need to download and run the DSD Button Controller Configuration Utility for the 64 Button Controller HERE - this configuration program is NOT the same as the one for the 32 buttons controller and that one cannot be used for the 64 button version. You must use this configuration utility if you wish to connect on/off toggles, rotary switches and rotary encoders to the device. The usage conventions to this utility are exactly the same as what's shown for the 32 button version.
You will need to download and run the DSD Button Controller Configuration Utility for the 64 Button Controller HERE - this configuration program is NOT the same as the one for the 32 buttons controller and that one cannot be used for the 64 button version. You must use this configuration utility if you wish to connect on/off toggles, rotary switches and rotary encoders to the device. The usage conventions to this utility are exactly the same as what's shown for the 32 button version.
Section 3: Using the DSD 12 Bit Controllers
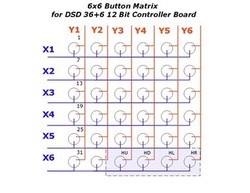
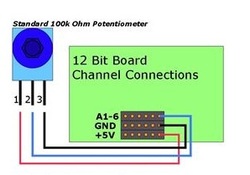
DSD 12 Bit controllers have 6 analogue axis inputs and up to 36 button connections (in a 6x6 matrix). The diagrams below show how to properly connect various components and buttons to the board. Note the following details:
DSD 12 Bit controllers have 6 analogue axis inputs and up to 36 button connections (in a 6x6 matrix). The diagrams below show how to properly connect various components and buttons to the board. Note the following details:
- Use 100k Ohm potentiometers if you connect pots to the analog channels; 10k Ohm potentiometers may be used as well
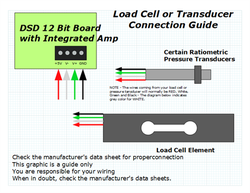
- DSD Circuit Boards will also allow you to connect hall effect sensors, or pressure transducers to the analog channels. Refer to the manufacturers' data sheets for correct wiring instructions
- Shunts are supplied on all boards with analog inputs. If you are not using that particular input, leave the shunt on the GND and A(n) pin to prevent calibration interference
- If you are using a "Sam Sensor" (a three wire pressure sensor), you must connect that to one of the A(n) inputs; those do not connect to the load cell amplifier
- If you are using a DSD 12bit controller with integrated amplifier AND DO NOT have a load cell element connected to the terminal block (Z-Rotation Axis), you will need to connect a small piece of jacketed wire between the GND and V- connections to avoid any calibration interference on that analogue axis input. IF YOU DO have a load cell connected on the terminal block, do not connect this wire
|
Section 4: Connecting Shunts
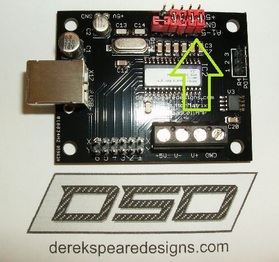
Shunts are necessary to prevent calibration interference on any unused analogue input channels. The photo to the right shows the shunts connected properly on Analogue input A1, A2, A3 and A4. The shunt connected on A5 is a spare. Shunts are connected between A(n)+GND where A(n) is an unused analogue input connection. For example, if you had a connection on A1 and A2, the analogue inputs of A3, A4 and A5 would be shunted. The shunts ensure that any unused analogue input channel has zero output and remain that way when calibrating your DSD 12 Bit Controller. Each DSD 12 Bit Controller is supplied with shunts in place as shown on the photograph to the right. |
Section 5: Using the DSD 12Bit Controller with the utility DXTweak
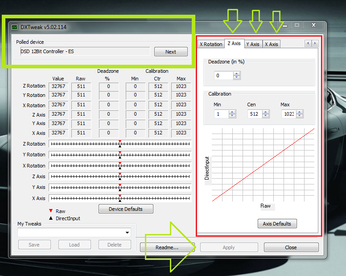
We advise our customers that use this device outside of iRacing to use DXTweak to allow them control over things such as dead zones and analogue axis ranges. Moreover, it's a great way to make unused analogue axis inputs entirely silent to eliminate any calibration difficulties that some folks can experience. To do that, refer to the graphic on the left.
We'll assume that the DSD 12bit controller is used and that it's used for pedals, those pedals being connected to the last three inputs. Those last three inputs are "X-Rotation, Y-Rotation and Z-Rotation". The unused axis inputs of X, Y and Z are not being used.
To remove any unused input "chatter" download DXTweak, run it. You will need to click the "Next" in the dialog box that appears where the enumerated game controllers are indicated until you reach the one named "DSD 12Bit Controller - ES". When you have that one, you will then need to manually set the X, Y and Z axis inputs to specific values. Refer to the above graphic.
Click on the Z-Axis, Y-Axis and X-Axis tabs and manually enter these values: MAX: 1024 - CEN: 512 - MIN: 1
Once you have done that for ALL THREE axis inputs (only the Z-Axis, Y-Axis and X-Axis), click the Apply button and then the Close button. When you have completed this in DXTweak you can now set the pedal inputs in your non iRacing title without any trouble.
Here's a link for DXTweak from the DSD Site: http://www.derekspearedesigns.com/download/DXTweak2.exe
Note that in most cases such a program isn't needed, but there are some times where it helps things along when they can be stubborn. And yes, once you set it, you can forget it. Also note that DXTweak runs on Windows 7, Windows 8, Windows 8.1 and Windows 10 (We've tested it on fully updated machines running all four operating systems).
Section 6: Other Utilities You May Find Useful
Your use of the following utilities are your responsibility. These various utilities may be beneficial to your efforts, but none are needed to use DSD Circuits or components. They're hosted here for download as a convenience to our customers.
DXTweak: http://www.derekspearedesigns.com/download/DXTweak2.exe
DIView: http://www.derekspearedesigns.com/download/DIView.exe
USB View: http://www.derekspearedesigns.com/download/usbview.exe
SVMapper: http://www.derekspearedesigns.com/download/SVMapper1.0.0.59.zip
Joy2Key: http://www.derekspearedesigns.com/download/JoyToKey_en.zip
Section 7: Using the DSD G25 to G27 Non-USB Shifter Adapter and DSD Pedal Pal
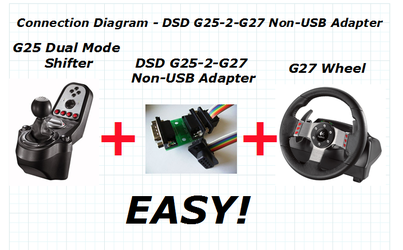
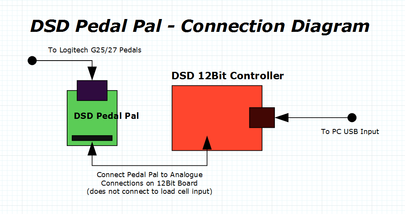
Refer to the diagrams below to connect your G25 Dual Mode shifter to a G27 wheel base by using the DSD adapter made for this purpose and your G25 or G27 pedals directly to your PC by using the DSD Pedal Pal and USB controller board (USB Controller sold separately):
Refer to the diagrams below to connect your G25 Dual Mode shifter to a G27 wheel base by using the DSD adapter made for this purpose and your G25 or G27 pedals directly to your PC by using the DSD Pedal Pal and USB controller board (USB Controller sold separately):
Section 8: Useful information and links to components certified for use with DSD circuits
Folks need information, and information is there for them. Organizing it is not easy or fast on many occasions, and sifting the wheat from the chaff can take much effort. We're asked regularly about various components such as potentiometers, encoders, sensors, etc. and where to find them. Here's a reference post for posterity everyone can access when they need certain components.
Be advised that these components or types of components are certified to function properly with DSD circuit boards. These are our recommendations, have been tested for proper function, and these components are often used in DSD components. There may be other options out there. If you want those, you have to source them on your own. Other or alternate components or sources may exist. We don't provide alternate sources, and we trust the ones below.
Errata: Note carefully that the information above outlines components we recommend and what we have tested and certified for use with DSD electronics. Are there other components? Sure. We have provided some which have been tested and confirmed functional. USE OF DSD ELECTRONICS IS YOUR COMPLETE RESPONSIBILITY. Should you burn one up, render one inoperable or otherwise cause a board to malfunction, we cannot help you. You are expected to follow the connection instructions here and are responsible for the device. We thoroughly and completely test every DSD circuit prior to packaging and shipping to ensure proper function. All DSD Electronics are shipped in a static proof envelope.
All Sales for DIY Components and DSD Electronics are Final.
All Sales for DIY Components and DSD Electronics are Final.

